Source: https://datafa.st/docs/bot-traffic-tracking
Markdown source: https://datafa.st/docs/bot-traffic-tracking.md
Description: Track AI assistants, search crawlers, and model-training bots from your server so you can see which pages crawlers request.
# Bot traffic tracking
See when AI assistants, search engines, and model-training crawlers request pages on your website.
## Get started
Install the server-side package, add one tracking call in your backend, then deploy. This is separate from the normal DataFast browser tracking script.
> See [@datafast/ai-crawl on NPM](https://www.npmjs.com/package/@datafast/ai-crawl)
### 1. Install the package
~~~bash
npm install @datafast/ai-crawl
~~~
### 2. Add it to your server proxy
Here is the most common setup for a Next.js app hosted on Vercel (more examples below):
~~~ts
// proxy.ts
import {
NextResponse,
type NextFetchEvent,
type NextRequest,
} from "next/server";
import { trackAICrawlerRequest } from "@datafast/ai-crawl";
export function proxy(request: NextRequest, event: NextFetchEvent) {
// 👇 DataFast AI crawler tracking starts here 👇
trackAICrawlerRequest(request, event, {
websiteId: "dfid_******",
});
// 👆 DataFast AI crawler tracking ends here 👆
return NextResponse.next();
}
export const config = {
// Optional: avoids running proxy for obvious API/static asset requests.
matcher: ["/((?!api|_next/static|_next/image|favicon.ico).*)"],
};
~~~
> This is server-side tracking. In modern Next.js, put it in proxy.ts (previously called middleware.ts / middleware.js), or use your backend, edge function, or worker. Pass the runtime context, such as event or context, so the package can use waitUntil internally. ❌ Do not await trackAICrawlerRequest; call it, then return your response.
### 3. Deploy and check your dashboard
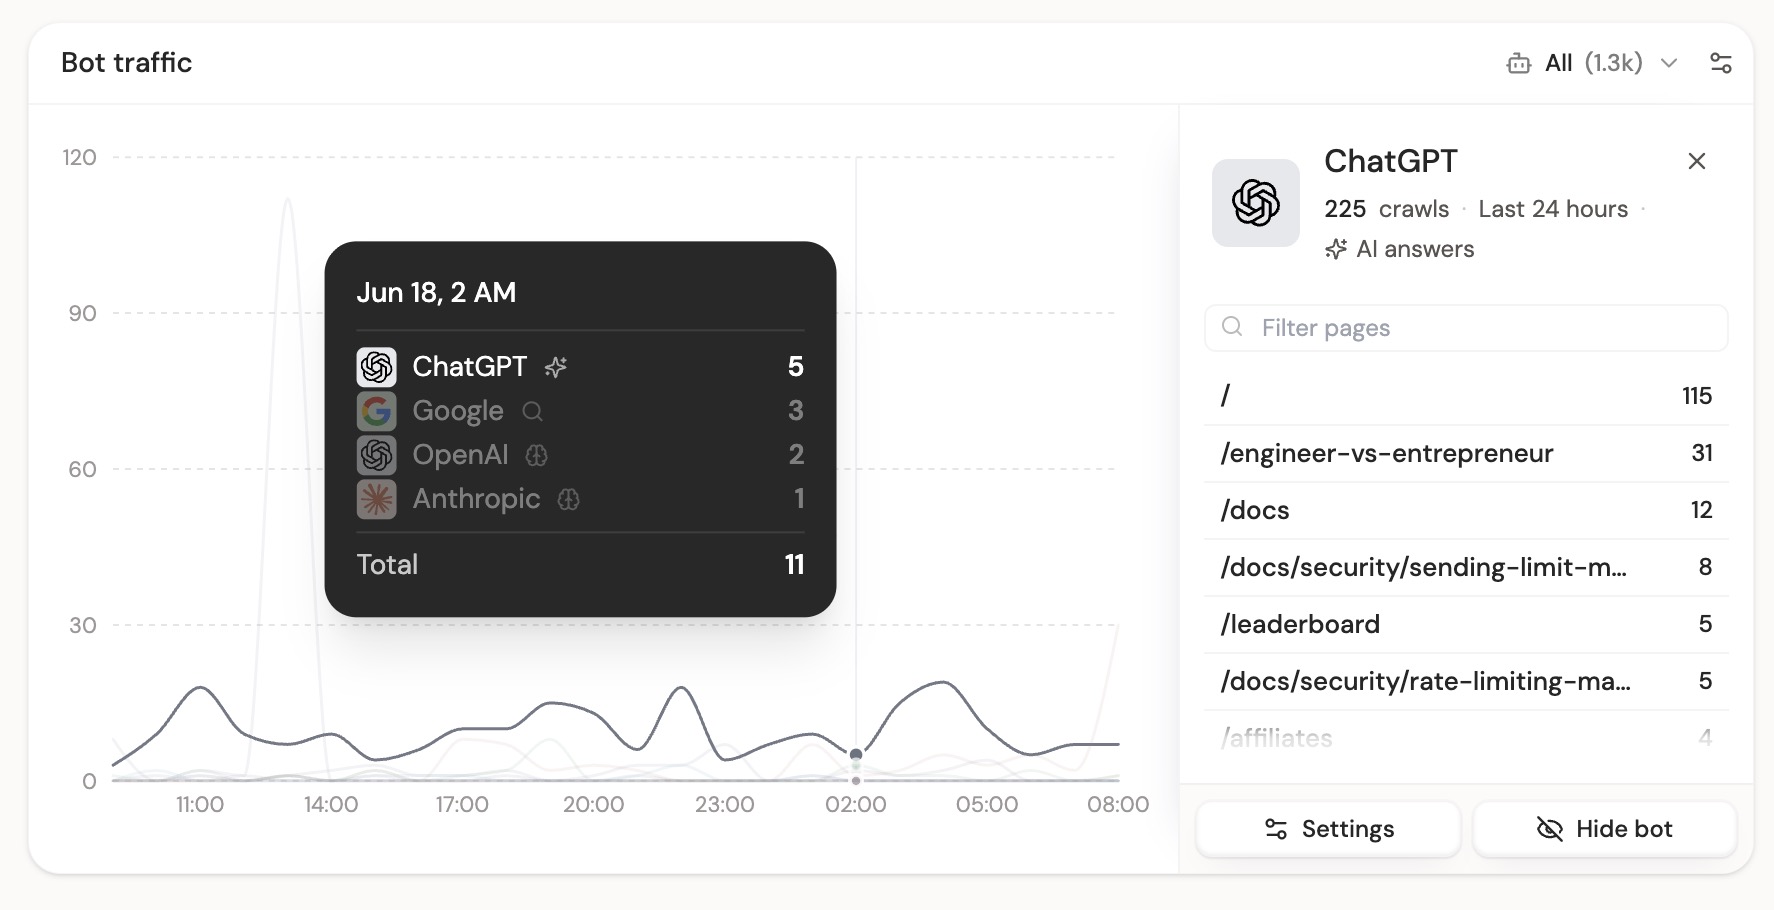
After deployment, open your DataFast dashboard and look for the **Bot traffic** card. You can filter by AI answers, indexing, training, and IP verification confidence.
Using Cloudflare, Express, Hono, or another backend? Use the platform examples below.
## What this tracks
AI tools and search crawlers now read your site before many users do. The pages they request show what they are trying to answer, index, or learn from, including missing URLs they expected to find.
DataFast groups bot traffic into three main categories:
| Category | Practical example | Why it matters |
| --- | --- | --- |
| AI answers | A user asks ChatGPT about your product, and ChatGPT requests your pricing or docs page to answer accurately. | Shows which pages AI assistants fetch when users ask questions. |
| Indexing | Googlebot, Bingbot, Applebot, or PerplexityBot requests your pages to update search or answer indexes. | Shows which companies are discovering and refreshing your content. |
| Training | Anthropic's ClaudeBot, OpenAI's GPTBot, Bytespider, or another training crawler requests public content. | Shows which crawlers are collecting public pages that may be used for model training or large-scale datasets. |
If a crawler repeatedly requests /free-trial, /docs/get-started, or another path that does not exist, that can be a useful content signal. It may mean users, agents, or crawlers expect that page to exist.
## How the package works
The package runs in your backend, middleware, edge function, or worker. For each request, it quickly ignores obvious static assets, API routes, framework internals, and normal human browser traffic. If the request looks like bot traffic, it sends a small event to DataFast.
DataFast then classifies the provider, crawler type, confidence, and IP verification on the server. This keeps crawler lists and IP ranges up to date without asking every customer to upgrade the npm package each time a crawler changes.
**The tracking request is best-effort and should not slow down your site.** On Vercel, Cloudflare, and other runtimes with waitUntil, the package uses it internally when you pass the runtime context. Call trackAICrawlerRequest, return your response immediately, and DataFast finishes in the background. Do not await it in proxy/middleware.
> **Bot traffic tracking runs server-side** because AI crawlers often request raw HTML and skip frontend JavaScript.
## Platform examples
### Next.js / Vercel Proxy
Create or update proxy.ts (previously called middleware.ts / middleware.js):
~~~ts
// proxy.ts
import {
NextResponse,
type NextFetchEvent,
type NextRequest,
} from "next/server";
import { trackAICrawlerRequest } from "@datafast/ai-crawl";
export function proxy(request: NextRequest, event: NextFetchEvent) {
trackAICrawlerRequest(request, event, {
websiteId: "dfid_******",
});
return NextResponse.next();
}
export const config = {
matcher: ["/((?!api|_next/static|_next/image|favicon.ico).*)"],
};
~~~
Vercel provides event.waitUntil, so the DataFast request is scheduled in the background. Middleware runs before the final page response, so status code is usually stored as unknown.
### Cloudflare Pages
Create functions/_middleware.ts:
~~~ts
import { trackAICrawlerRequest } from "@datafast/ai-crawl";
export async function onRequest(context) {
trackAICrawlerRequest(context.request, context, {
websiteId: "dfid_******",
});
return context.next();
}
~~~
Cloudflare Pages provides context.waitUntil. The package uses it internally, so Cloudflare can continue returning the HTML response while the DataFast request runs in the background.
For better Cloudflare billing and performance hygiene, exclude obvious static assets from Pages Functions invocation when your framework does not generate this automatically. Add _routes.json to your build output:
~~~json
{
"version": 1,
"include": ["/*"],
"exclude": [
"/assets/*",
"/static/*",
"/_next/*",
"/favicon.ico",
"/robots.txt",
"/sitemap.xml",
"/*.css",
"/*.js",
"/*.png",
"/*.jpg",
"/*.svg",
"/*.ico",
"/*.woff2"
]
}
~~~
The package still filters static assets locally, but _routes.json prevents Cloudflare from invoking your Function for obvious asset requests.
### Cloudflare Workers
Wrap your Worker handler with withAICrawlerTracking:
~~~ts
import { withAICrawlerTracking } from "@datafast/ai-crawl";
export default {
fetch: withAICrawlerTracking(
async (request: Request, env: Env, ctx: ExecutionContext) => {
return fetch(request);
},
{
websiteId: "dfid_******",
},
),
};
~~~
This version can capture status code because the wrapper sees the response your handler created. It still uses ctx.waitUntil when available, so tracking is best-effort and non-blocking.
### Express
~~~ts
import express from "express";
import { createExpressAICrawlerMiddleware } from "@datafast/ai-crawl";
const app = express();
app.use(
createExpressAICrawlerMiddleware({
websiteId: "dfid_******",
}),
);
~~~
The Express middleware calls next() immediately. It attaches a finish listener and sends the bot traffic event after the response has already been sent, so your app does not wait for DataFast before continuing.
### Hono
~~~ts
import { Hono } from "hono";
import { trackAICrawlerResponse } from "@datafast/ai-crawl";
const app = new Hono();
app.use("*", async (c, next) => {
await next();
trackAICrawlerResponse(c.req.raw, c.res, c.executionCtx, {
websiteId: "dfid_******",
});
});
~~~
Use this when your Hono runtime gives you access to both the final response and an execution context.
### Generic Request / Response handler
If your backend gives you a standard Request and Response, track after your app creates the response:
~~~ts
import { trackAICrawlerResponse } from "@datafast/ai-crawl";
export async function handleRequest(request, context) {
const response = await yourAppHandler(request);
trackAICrawlerResponse(request, response, context, {
websiteId: "dfid_******",
});
return response;
}
~~~
If your backend only gives you the request before the response exists, use request-only tracking:
~~~ts
import { trackAICrawlerRequest } from "@datafast/ai-crawl";
export function middleware(request, context) {
trackAICrawlerRequest(request, context, {
websiteId: "dfid_******",
});
return next();
}
~~~
Request-only tracking is enough to know which page the bot tried to crawl. Response-aware tracking only adds status code when it is easy to get.
## Optional category filters
By default, DataFast tracks all relevant bot traffic categories. You can disable categories if you only care about specific crawler types:
~~~ts
trackAICrawlerRequest(request, event, {
websiteId: "dfid_******",
disableAnswerFetch: true,
disableSearchCrawlers: true,
disableTrainingCrawlers: true,
disableOtherCrawlers: true,
});
~~~
Most websites should keep the defaults. The dashboard lets you filter the data later by AI answers, indexing, training, and verification confidence.
## Where to find the data
After installing the package, open your DataFast dashboard and look for the **Bot traffic** card. You can filter by crawler type, show only IP-verified crawlers, and inspect which pages each provider requested.
If you do not see data immediately, that usually means no known crawler has requested your server-rendered pages yet. Human pageviews do not appear in this card.